The Housing Glitch Guide
A collective work by several housing designers to provide a indepth glitch guide for everyone to use and carry with them throughout their design process
_______________________________________
Authors: Ashen Bride | Synt Slap
Glitching in Final Fantasy XIV: Online
HGXIV's Housing Glitch Guide
- Authors: Ashen Bride | Synt Slap
- Basic Glitches
This section consists of glitching methods that you’ll use often in the design process. You’ll read things like “tabletop float”, “countertop surface” and “lifting” and we’re going to make it easier to understand the process behind each one. Some things that we mention are explained in the Basics Guide, so make sure to check it out if you want to get get started.
- Tabletop Floating
The tabletop float glitch (or shelf float) is the most common glitch to learn. You’ll use this one often when you want to change the way tabletop items look. Like whether you want to use a free floating lamp for a hanging light, or putting a book atop a bed.
This works with Tabletop items only, and the furniture name will always have a description of what is considered tabletop. To do this glitch, you will need the following:
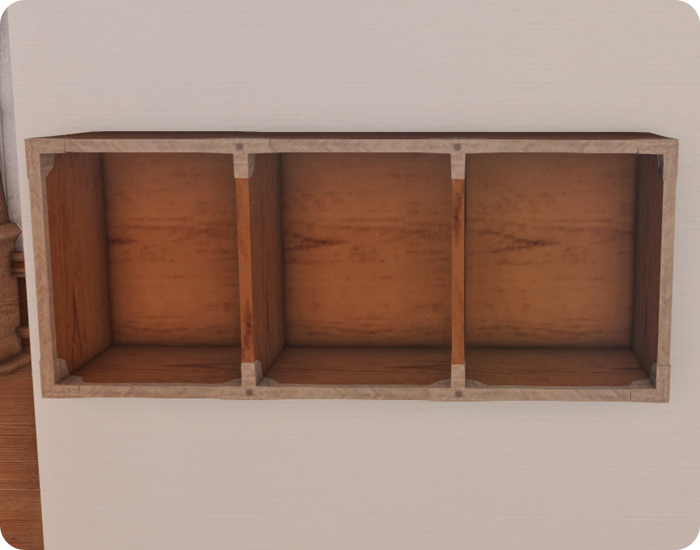
– The Riviera Shelf is your trusted friend. You will use this shelf for the glitching process. The shelf is treated like a Table although you can attach it to a Partition.
– A Stage Panel is the recommended wall to use because you can use the whole surface area whereas other partitions have designs that won’t allow you to place your shelf naturally.
- Step-by-step:
- Disable Counter Surface Placement
- Pick up the wall item with Left Click
- Cancel movement with Right Click
- Move your wall away
- Wall Floating
The Wall Floating Glitch follows the same steps as the Tabletop Float. This is what you’ll use for floating windows into place, and structural things like beams. Maybe even a wall planter or two to hide some mistakes! To do this glitch you’ll need the following: Any wall item and a Stage Panel. The furniture description will have whether it’s a wall item or not.
- Step-by-step:
- Disable Counter Surface Placement
- Pick up the wall item with Left Click
- Cancel movement with Right Click
- Move your wall away
- Housing Tip
You’ll use this floating glitch more often than you think! If you want to float wall items and change the look of it by turning it around, you’ll always need a stage panel or false wall behind it so it can remain that way without “snapping”. White Rectangular Partitions, Wood Slats, and full partitions will always treat the wall item as intended.
- Item Snapping Removal With Inventory
This is a fairly easy Quality of Life glitch, and it goes hand in hand with the Tabletop and Wall Floating glitches. If you’re having trouble removing the shelf or wall, or you’re unable to grab at items due to a camera angle, you can remove a furnishing item from the house and then remove the shelf/wall. Either place something down from your bags, or grab a stray wall that’s sitting around. Make sure you return to inventory, not to storage!
Have you ever dragged a shelf across the room, tried to remove it, but it says something is attached but you don’t know where it is? If you follow the steps above, you can click on the item in the Furnishing list and manually remove it that way. It’s incredibly handy for last minute frustrations!
You might find yourself completely replacing tabletop and wall floats with this method, and that’s okay, too! Moving a wall away has its pros and cons because sometimes you will accidentally grab a stray wall object as you move the wall across the room. Using this item removal glitch can actually save you a little headache.
- Step-by-step:
- Place item from bag
- Remove Item
- Remove shelf
- Storage Glitching
By Default, PC will always be NUM * and Console players will use Square.
Go into System > Keybind > System > Display Subcommands to change the keybind if you want something different. Storage Placement is an important glitch. It allows you to place furniture in places where you are unable if you are just placing directly from your Inventory.
Outdoor and Indoor storage have separate storeroom spaces. It’s essentially another “house” for your stuff.
| Slots per housing / room type | Indoor | Outdoor |
| FC Chamber/Apartment | 100 | — |
| Cottage | 200 | 20 |
| House | 300 | 30 |
| Mansion | 400 | 40 |
The Storeroom can be located near the top of your Indoor Furnishings menu. Storage has several unique features that you’ll use often when glitching. It allows you to place furnishing items in places and boundaries of the house that you’re unable to do with your inventory. We use Storage placement to put windows onto Walls and Wooden Beams so we can Float it. You’ll use Storage placement to put furniture onto the railings, to get that extra height boost and in a stairway when you want to use walls to cover the fixtures.
The #1 rule of Storage Placement is make SURE it’s in your Storage and you have Display Preview enabled. You will be unable to pick up and move the furnishing if Display Preview is disabled by accident. If you’re placing from Inventory, your furnishing will end up in Storage once you use your subcommand to place, and you’ll wonder what’s happening. Don’t worry, we’ve all been there!
- Storage Placement #1
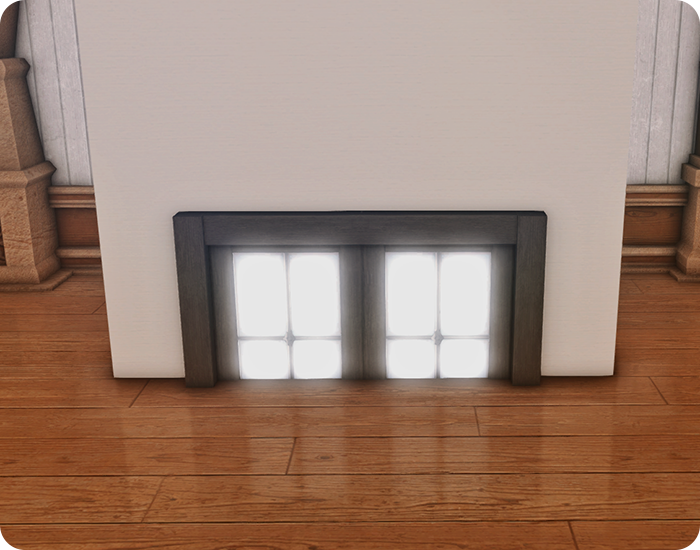
Storage Placement can allow you to push furniture past the boundaries of a House to a point. Every furniture piece has a Middle point that can be calculated to see how far you can conceivably glitch an item until the natural boundaries of the house walls stop it. In the example below, you can do a storage placement glitch by angling your character close to the wall, and placing directly from storage via subcommand. One wall is already placed down normally through inventory, and you can see there is a difference in depths.
The downside to Storage placing this way is it depends on the angle of your character, and precision, so relying on this type of glitching will take a lot of time and patience and your FC will be worried about you.
- Step-by-step:
- Position yourself and angle your camera
- Select furniture from storage
- Rotate to confirm placement
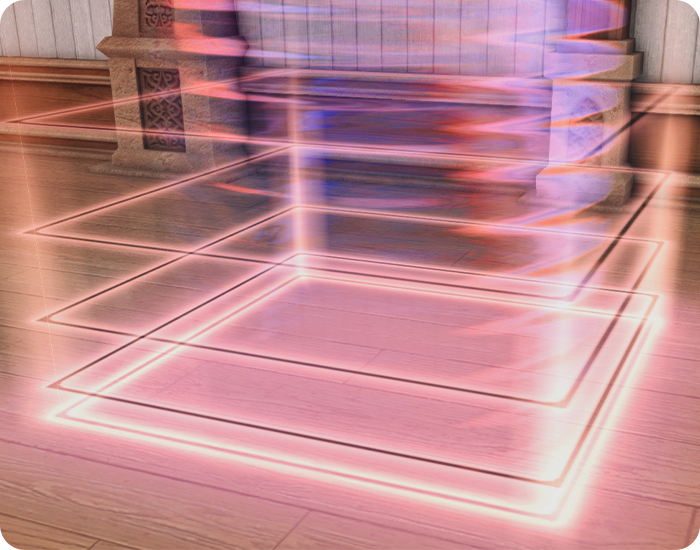
In the gif below, there’s a White Rectangular Partition placed normally and then one being Storage Placed. Do you also notice anything else? The Orange Reticle on furniture is an important marker! It always shows the middle of the furniture, which you will need for Float Anything Glitching, and it also marks the boundary where furniture can be pushed into the house walls.
- Housing Tip
The orange marker is an important visual marker for you to use when doing the Float Anything glitch. Your shelf/wooden loft will always have to hit the center of the object, and sometimes it’s difficult to tell where the center is, so you can find it by selecting the item.
- Storage Placement #2
The second most common method for Storage Placement is to pick up directly from storage, and then place it on something you normally can’t place furniture. Like on stairs, railings, and the most popular being window placement onto free standing partitions. You’ll see you can’t place it because the item will flash Purple instead of Orange, but Storage Placement will override this.
- Step-by-step:
- Enable Display Preview
- Make sure the furniture item is in your Storage
- Pick up and place the item via subcommand
- Housing Tip
This particular Storage Glitch will be the one you use the most frequently. The only way to place Imitation Square Windows onto a fake wall surface, like a Stage Panel or Wooden Beam, is to pick it up from Storage and place it with your subcommand. Some windows like the Small Imitation Window and Cracked Arch Window places normally, but these older windows aren’t as lucky!
- The Float Anything Glitch
Around December 2018, the housing community was changed forever! Laduga Earhart, a Japanese housing designer, discovered how to float furnishing using different table surfaces, until eventually it could “float” an item. Previously we could only achieve this with wall and tabletop items. It changed the landscape of what’s possible with housing, and has made customizing furniture into a whole new game. You have probably seen a lot of text and video guides tackling this subject, and it’s no wonder. This glitch will be your bread and butter, and it’s also unfortunately the most difficult and time consuming of the glitches we’ve covered. Learning how to do this correctly and consistently is going to save you many headaches in the long run. If you’re looking for a complete furniture guide and how high things can be lifted without snapping
Check out the Minimum Furniture Height Guide ➜
Floated items have a minimum height requirement that you’ll have to meet, which is how high the item needs to be for it to not drop back down to the ground. This varies between item to item with some being very low and others so high that practicality often goes out the window (RIP Big Bathtubs). Additionally, items will lift in different increments but more on that later.
Firstly, we need to determine the center point of the item we want to float. You can either eyeball this, or select the rotate option and click on the item. The middle of the rotation circle that appears at the bottom of the item is the dead center.
- Floating with a Loft or Shelf
To float an item we need to intersect the middle of it with another, we typically use the Riviera Wall Shelf or Wooden loft for this. As these are wall mounted we need to affix them to either a partition such as the stage panel or a wooden beam.
Every furnishing has a different maximum amount it can be lifted at once, in the case of the White Rectangular Partition that is being used as an example, that amount is slightly over one riviera wall shelf in height.
You can see in the gif how I place the stage panel just off center of my wall, and I verify the center by using the rotate button. The riviera wall shelf needs to hit the center. Place the shelf crossing the middle of the rectangular partition no more than its own height from the bottom, and press ESC within the next second, if done correctly the item will lift. White Rectangular Walls are a special case on how high you can lift the item with each “jump”, notoriously being very tiny. You will experience different jump heights with different furniture and we will try to explain what that means.
- Minimum Height Requirement
At this point you’ve lifted your item once, but if you now completely leave the housing menu it will drop to the ground. Why is this? Remember that minimum height requirement I mentioned earlier? Well, you need to reach it for it to stay floated, that requirement is always higher than the maximum amount you can lift in one go but is slightly less than 2x the maximum lift. The gif below shows an example of what it looks like if you exit the menu and you haven’t hit the requirement properly. Your item will “fall” back to the ground.
- Furnishing with the lowest jump heights
Factory Partition | Stage Panel | Wooden Slat Partition | White Rectangular Partition
You will ALWAYS need to lift an item more than once! At that point you can leave the housing menu and if the item doesn’t drop, you know you’ve at least reached if not passed the minimum height requirement. You’ll also find in your housing journey that some furniture items react very differently as you begin to float them.
Rugs and beds are notoriously easy to lift with a loft, jumping high with each lift, but you’ll barely be able to get a Factory Partition and Wood Slat off the ground without tiny incremental steps. You will find yourself switching between enabling Grid Snap On and Off to achieve what you need, but these items will always have Grid Snap Disabled due to the low jump heights. The White Screen, however, is unique. Due to the surface area, use a Wooden Loft. To read more about this, go here.
- Don't forget to Rotate
Once the item is to the height you want it, you will need to lock it’s position. Unlike the tabletop floating glitch, ground furnishings don’t just stay by default.
To lock the position you need to ROTATE the furnishing (Playstation/controller users will need to swap to mouse mode to do this). You can either perform a hard rotate, or if you’re using a mouse you can left click twice on the furnishing which functions as a select and deselect!
If you forget to rotate your items, you’ll find all your hard work floating is suddenly back on the floor the next time you exit and re-enter your humble abode.
Often when layering different things, you will have quite a mess of furniture in your camera. It’s every designer’s burden! You will have to rotate items out of the way. Make sure you don’t accidentally “save” furniture into a new position as you work, as rotating will always finalize the process and you might accidentally mess up your progress. There’s different ways you can keep track of things.
➜ Dye your furniture items different colors to keep track.
➜ Rotate items out of the way, and lift the piece you’re working on, and rotate that one to finalize it. Don’t touch the other furniture you had to move around. When you exit and re-enter, everything will be locked into the previous saved spot.
➜ If you accidentally click on an item when under the Rotate function, as long as you ESC or close the Housing Menu, it won’t lock!
- Advanced Glitches
Are you ready to feel the burn?? We’re diving into some more advanced glitching techniques, but don’t worry! You’ll be slinging shelves and walls around like a pro in no time. Everything takes time and effort, and the learning curve might seem steep and become a nuisance when you’re surrounded by 30 walls, but you’ll surprise yourself with how quickly you’ll get used to things once you do it enough. Or you’ll just smile through the pain. „To house is to suffer“ after all.
- Craning Items
This is an advanced technique of the Tabletop and Wall Floating glitches. You can sink wall items and tabletops into the floor but there’s a limit if you’re using just the wall. If you want to go FURTHER BEYOND then you’ll need a “crane”, which consists of Wooden Beams. This is a very popular method to get windows into place easily, since you can adjust the crane better instead of a wall. Often you’ll hear us say the “window needs to be rotated” to keep from snapping to a wall. What we mean by this is putting it onto a wooden beam, and rotating the entire wall, so your window is flipped around.
- Housing Tip
Stage Panels are unique in that you can rotate and flip wall items around and the item won’t “snap” and force its way back into position. Other false walls like the back of Disordered Wardrobes, Showcases and Wooden Staircase Bookshelves are also popular to use. Check out our wall section for some recommended choices.
- Megacrane
I think you’re ready for more, though. I can tell you want to see THE MEGACRANE! You might think we’re joking, but the Simple Curtain is a popular and easy door knob, but the hit box is incredibly high. The only thing that can fix this is more cranes.
➜ Easiest example is what we just showed with the Simple Curtain as a door knob. You can put a marker onto the floor, and float from below, but you’ll still be going up and down to find the right height.
➜ If you’re in an apartment or FC chamber, you will need this method to sink tabletop and wall items because there’s no floor beneath you.
➜ If you build up high, taller than the height of a wall, you can save time by building a crane up instead of lifting walls to go higher.
➜ If you build up high, taller than the height of a wall, you can save time by building a crane up instead of lifting walls to go higher.
As far as we have tested, you are unable to “sink” items into the floor with this crane method. Although you can theoretically get a shelf underneath of furnishing like a wall, the flooring will always act as a barrier. There have been developments in placing your character into the floor, and using storage placement to put furniture into the floor, but it is very limited and the furniture does not go very deep.
- Floating Between Floors
When designing, you will often encounter the need to frame a window with walls or to change the look of a piece of furniture and use only the top of a cupboard. There’s different methods you can use to do this, and it will require some measuring and precision.
- Mounted Box Shelves
These shelves are an amazing and underestimated tool! The top of the shelf can go through floors, where a riviera wall shelf/wooden loft will always be stopped by the height of a wall. Use this to give your furniture an extra jump if you’re having trouble.
- World Markers
Using world markers is helpful because you can see them through the floor, and it loses all of the vertical lines. You’ll want to use the numbered World Markers because it will give you a square whereas the letters all have a circle. Use the lines to match up your Stage Panel as a way to measure where you need to lift your furniture.
- Windows
A large wall item object like a Window acts similar to World Markers, except the bottom will be seen from below. You can use this to line up walls from below, if you put a stage panel behind your window, to accurately get a measurement on bringing furniture up.
- The /doze trick
Sometimes when you’re floating something with a low jump height, like a White Rectangular Partition, you might need to float it THROUGH the floor. You can blindly boost it with a mounted box shelf, but if you want to see what you’re doing, floating a bed just underneath the ceiling and using /doze will allow you to see between the floors.
- The Floating Process
There will be times you’ll have to float a White Rectangular Partition or Wood Slat through the floor, but due to the low jump height, you’ll visually “lose” it with rafters and the ceiling in the way. Here’s the steps you’ll need to take to the next level!
➜ Lift your bed to the correct position for your character’s height to “look” through the floor
➜ Lift your bed to the correct position for your character’s height to “look” through the floor
➜ Enter into First Person mode
➜ Lift your wall! We recommend floating walls with a wooden beam attached to it
➜ (Optional) Exit out of the furnishing menu fast enough with Esc to stay on the bed, or you’ll be running back up to /doze again.
- Housing Tip
This isn’t an “everyday” glitch, you’ll maybe only encounter this if you’re making something like smooth stairs, and that’s still dependent on the height of your stairs and the walls you need. Smooth wall staircases often require this glitch. But it’s good to have this in your toolkit for whatever life throws at you!
- Glitching under the Stairs
There’s a lot of reasons why you might need to get under the stairs. Normally it involves having to float partitions a certain way, but sometimes you’ll have a fixture like a staircase railing and you can’t typically place a piece of furniture onto it, even with storage placement. To get around this, you’ll have to go from below!
- Small House
Getting under the stairs of a Small is not easy, compared to the other houses. You’ll have an easier time in Goblet and Lavender Beds, but Mist and Shirogane have a very huge void zone that makes furniture placement almost impossible. Shirogane is so difficult that you will likely have to use storage placement to place your walls on the stairs.
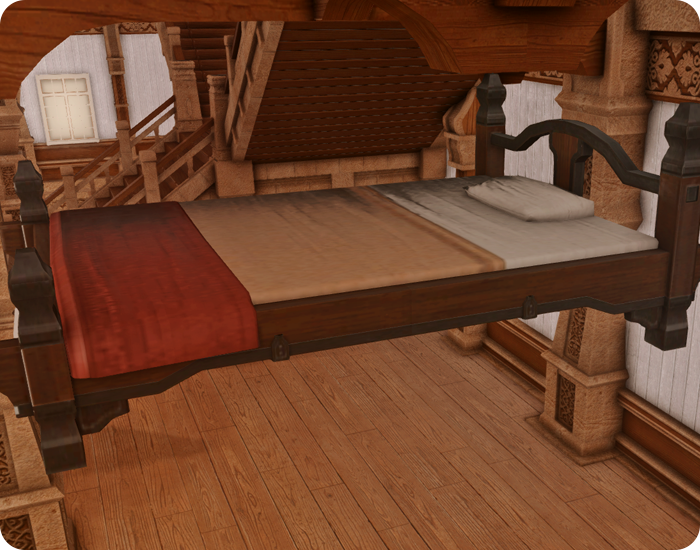
- Storage Place a bed as close as you can to the wall
- /doze on the bed. Your character will snap up if you do this correctly
- Go into first person, place a second bed from your inventory
Once you’re under the stairs, you can either place your furnishing normally if the void zone is small, or you will need to Storage Place at the edge of the void zone. Unfortunately you cannot place furnishing in the void, unless it’s a tabletop/wall item.
- Medium House
Luckily getting underneath a Medium is so much easier, and there’s no void zone interfering with furniture placement. What you’re aiming for is the empty space at the back of the stairs. However, an odd little thing is some districts have camera collision with the stairs! In Mist, for example, you can’t zoom your camera out to gauge your progress, so you will need to always make sure you have a bed ready to /doze if you need to go in and out! This technique will work for both the ground floor and the basement.
- Angle yourself and storage place a bed as close as you can
- /doze and it will put your character underneath the stairwell
- Remember to place a bed so you can /doze from the stairs and return!
- Large House
A Large house is probably the easiest of them all! You have so much space for activities. Unlike Smalls and Mediums, where you will likely be underneath this space to make smooth walls, a Large doesn’t have that problem necessarily. If you’re building underneath the stairs, the most common layout for a Large is to bisect it with walls, and use one side of the mansion.
- Housing Tip
The steps in a house act like a floor, or table surface. As you use the Float Anything glitch, you should be aware of the float height of your furniture, and how it will interact with the height of your stairs.
- Minimum Furniture Height Guide
When we first started to learn how to float furnishing in 2019, we started out using things like an Oriental Table, Hingan Wardrobe, Troupe Stage, etc to “jump” furniture. That became a baseline measurement, even when we were using shelves and lofts to float furniture. The spreadsheet created by Shei Cloudbank has been transformative for the community, and an incredible asset, and it was a pity to let it sit and remain there with old information and never updated.
“Will there ever be an update?” “Who would take it over and spend time doing such a thing?” Well, we heard your cries. It had to be someone, and it’s going to be us. We’re crazy enough about housing to do it.
We did all the legwork for you, and it’s got pictures, I know you like pictures. We made the monumental effort of acquiring all the furnishings in the game (excluding some Mogstation ones, sorry!) and we floated each one to find the minimum height using a new measuring system. Gone are the days of “Troupe Stage height” and asking “Sharlayan Cabinet who?” Now it’s all about Wooden Lofts and Riviera Wall Shelves.
Since we are adopting this new system of measurement, all the numbering on the images is based on approximations. We tried to accurately get as close as possible for every single one, but variances will exist. Generally whole numbers are a full Wooden Loft height, and .5 is half a Loft height, but in some cases they are not to give further indication of height.